Tableros que muestran el progreso sin andar persiguiendo actualizaciones de estado
Placker te da un tablero dividido en listas, con cada tarea como una tarjeta. Arrastra una tarjeta de una lista a la siguiente conforme avanza el trabajo, para que todo tu equipo vea de un vistazo qué sigue, qué está en curso y qué está terminado.
Resumen rápido
Tableros en Placker
Las tarjetas avanzan por listas que reflejan tu propio flujo de trabajo. Así es como los tableros mantienen el trabajo fluyendo:
- Todo en la tarjeta. Cada tarjeta guarda los detalles que importan, desde la descripción y la fecha de entrega hasta los miembros y los archivos adjuntos.
- Muévela conforme avanza el trabajo. Arrastra cada tarjeta de una lista a la siguiente para que el tablero siempre muestre lo que está en cola, en curso y terminado.
- Las listas se ajustan a tu flujo de trabajo. Nombra y reordena las listas para que se ajusten a tu forma de trabajar, y agrega nuevas etapas conforme aparezcan.
- Espacio para el trabajo activo. Oculta las listas vacías para quitar el desorden y darle más espacio al trabajo en curso.
Tablero Kanban
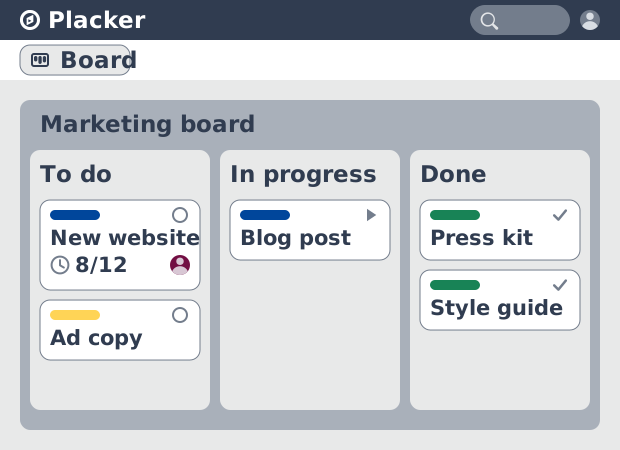
Una vista de tablero armada con listas y tarjetas
Cada pieza de trabajo es una tarjeta. Las tarjetas están en listas (Por hacer, En curso, Listo), y las listas están una al lado de la otra en un solo tablero, así que la propia disposición te muestra dónde está el trabajo. Una tarjeta guarda el detalle, desde su descripción y su fecha de entrega hasta miembros y adjuntos, mientras que su lista marca la etapa en la que está.
Abre un tablero y lees el estado del proyecto de un vistazo: qué está en la fila, qué está en curso, qué está listo. Mueves una tarjeta de una lista a la siguiente conforme avanza el trabajo, y el tablero sigue siendo un retrato fiel de dónde está todo, sin ningún documento de estado aparte que mantener sincronizado.
Listas flexibles
Se adapta a cualquier forma de trabajar
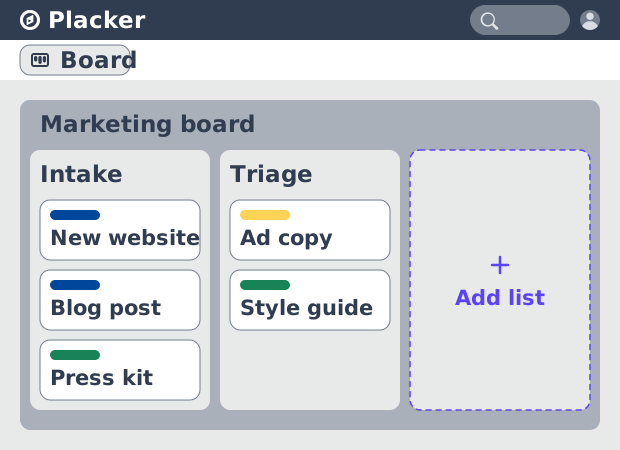
Esas listas que marcan cada etapa son tuyas para nombrarlas. Llámalas Por hacer y Listo, si es lo único que necesitas, o Entrada, Triaje, Programado y Enviado cuando el proceso tiene más pasos, sean cuales sean las etapas reales de tu trabajo. El tablero toma la forma de tu flujo de trabajo, en lugar de meter tu trabajo en una plantilla fija.
Eso sigue siendo cierto conforme el trabajo cambia. Agrega una lista cuando aparece una nueva etapa, reordénalas cuando cambian las prioridades y desactiva las listas vacías para darle más espacio al trabajo activo. Un tablero de sprint y una simple cola de solicitudes funcionan con los mismos bloques de construcción; tú decides cuántas listas hay y qué significa cada una.
Atributos personalizados
Da seguimiento a los datos con los que funciona tu trabajo
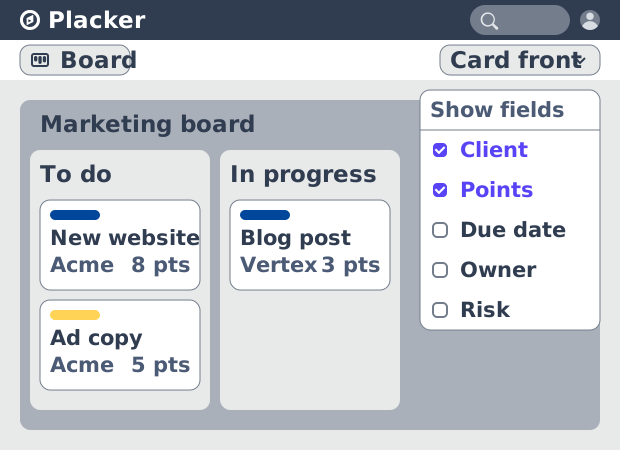
Las listas le dan al tablero sus etapas, y las tarjetas que pasan por ellas llevan más que un título y una fecha de entrega. Agrega atributos personalizados como texto, número, fecha, miembro o un estado de semáforo para capturar los datos con los que funciona tu trabajo, como el nombre de un cliente, una estimación en story points o un indicador de riesgo. Cada uno se vuelve un campo que puedes definir en cualquier tarjeta.
Pon en la frente de la tarjeta los atributos que importan y el tablero los muestra de un vistazo, sin abrir la tarjeta. Los datos que registras quedan junto al trabajo mismo, así que lo que de otro modo guardarías en una hoja de cálculo aparte vive en el tablero.
Listas de Verificación
Divide el trabajo dentro de una tarjeta
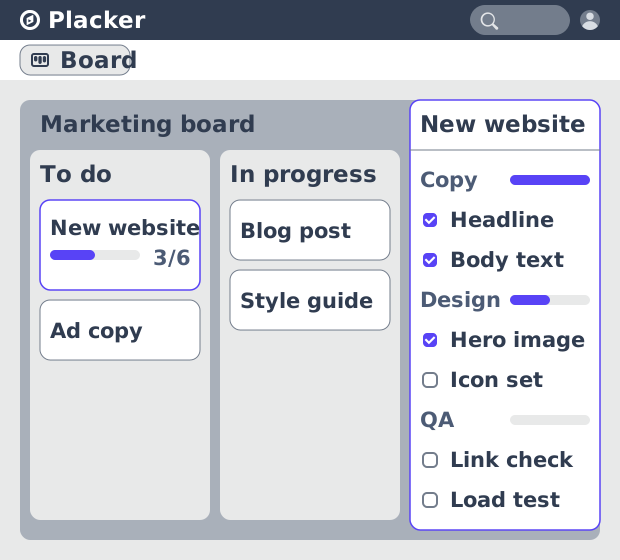
La frente de la tarjeta muestra esos datos de un vistazo, pero no toda tarea cabe en una sola tarjeta en una sola línea. Dentro de una tarjeta puedes agregar checklists y, dentro de cada checklist, un conjunto de ítems que dividen el trabajo más grande en pasos concretos. Una tarjeta de lanzamiento, por ejemplo, tiene un checklist para copy, uno para diseño y uno para QA, cada uno con sus propios ítems para marcar.
Marcar los ítems muestra cuánto ha avanzado la tarjeta, así que una tarea grande reporta su propio estado en lugar de esconderlo. Ese desglose queda dentro de la tarjeta a la que pertenece, así que conservas el detalle sin agregar una tarjeta aparte para cada pequeño paso.
Y cuando uno de esos ítems se convierte en un trabajo por sí mismo, no tienes que recrearlo en otro lado: Placker convierte un ítem de checklist en una tarjeta hija con su función de tarjeta padre-hija. El ítem se vuelve una tarjeta completa, con su propia descripción, fecha de entrega, miembros y checklists, sin dejar de estar vinculada a la tarjeta padre de la que salió, así que la tarea más grande conserva la visión general y el trabajo detallado obtiene una tarjeta donde vivir.
Cómo funciona
Los tableros funcionan igual, ya sea que tu proyecto quepa en unas pocas listas o se extienda por muchas. Este es el flujo, desde abrir un tablero hasta mover una tarjeta.
- 1
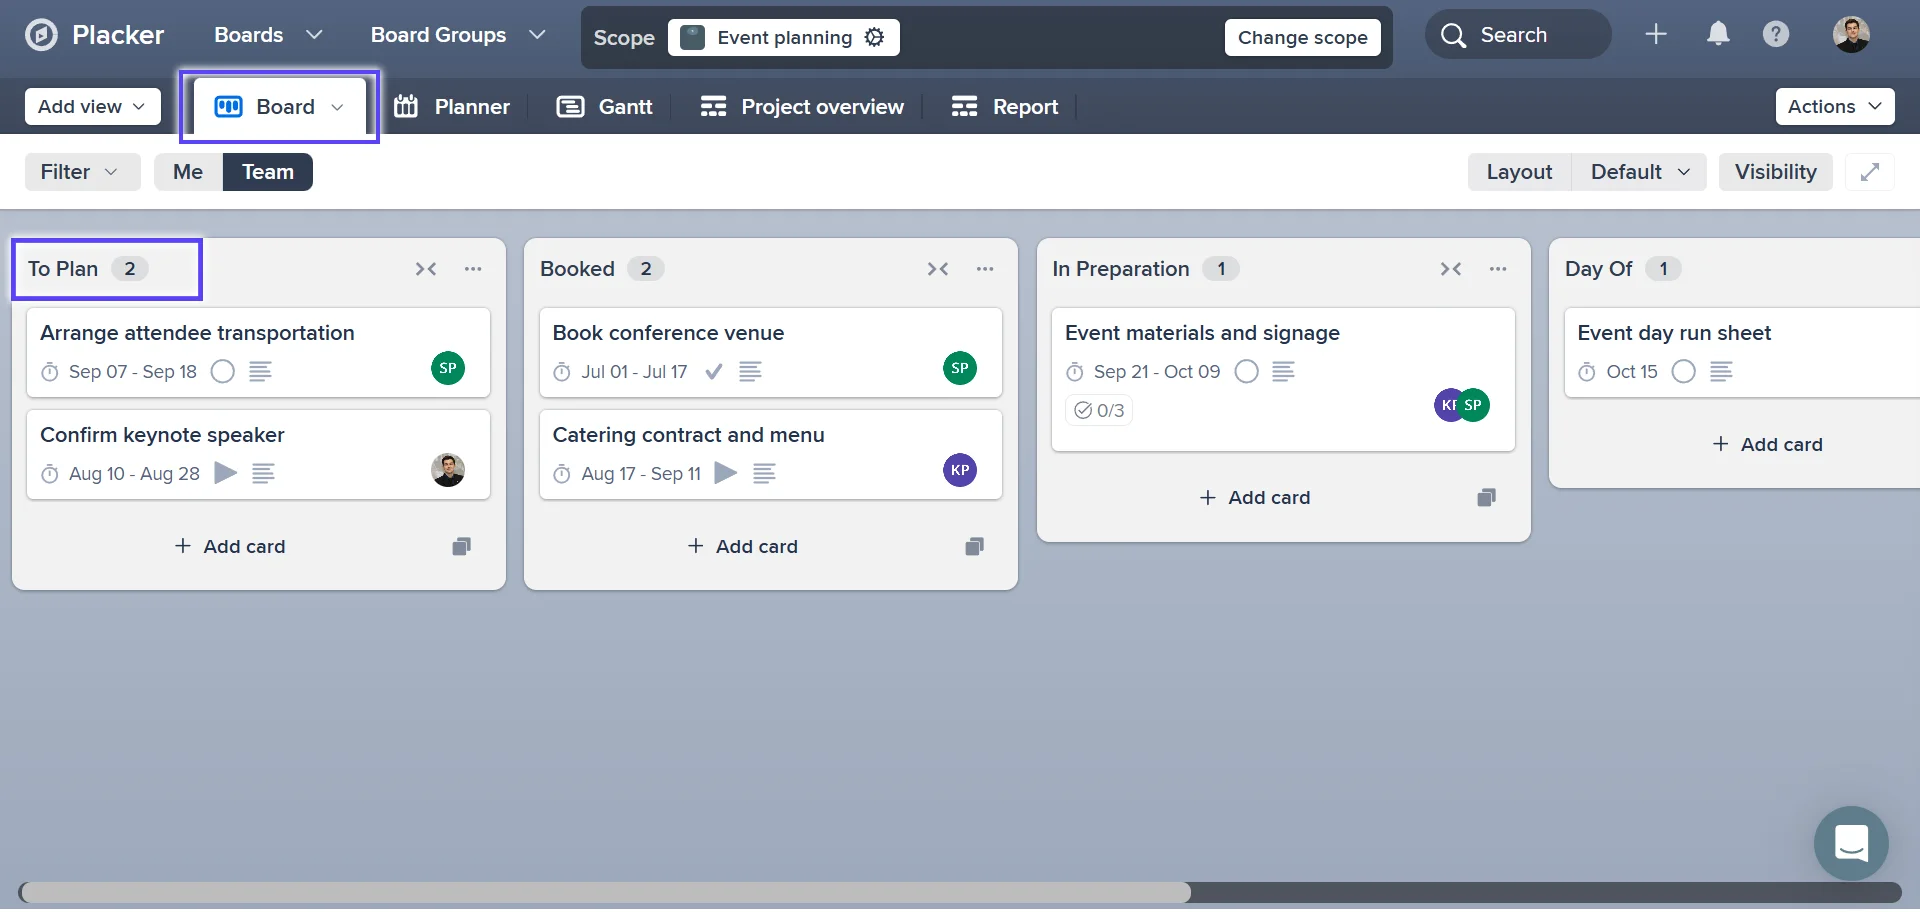
Abre tu tablero
Abre un tablero. Tus tareas aparecen como tarjetas, agrupadas en las listas que forman tu flujo de trabajo.
- 2
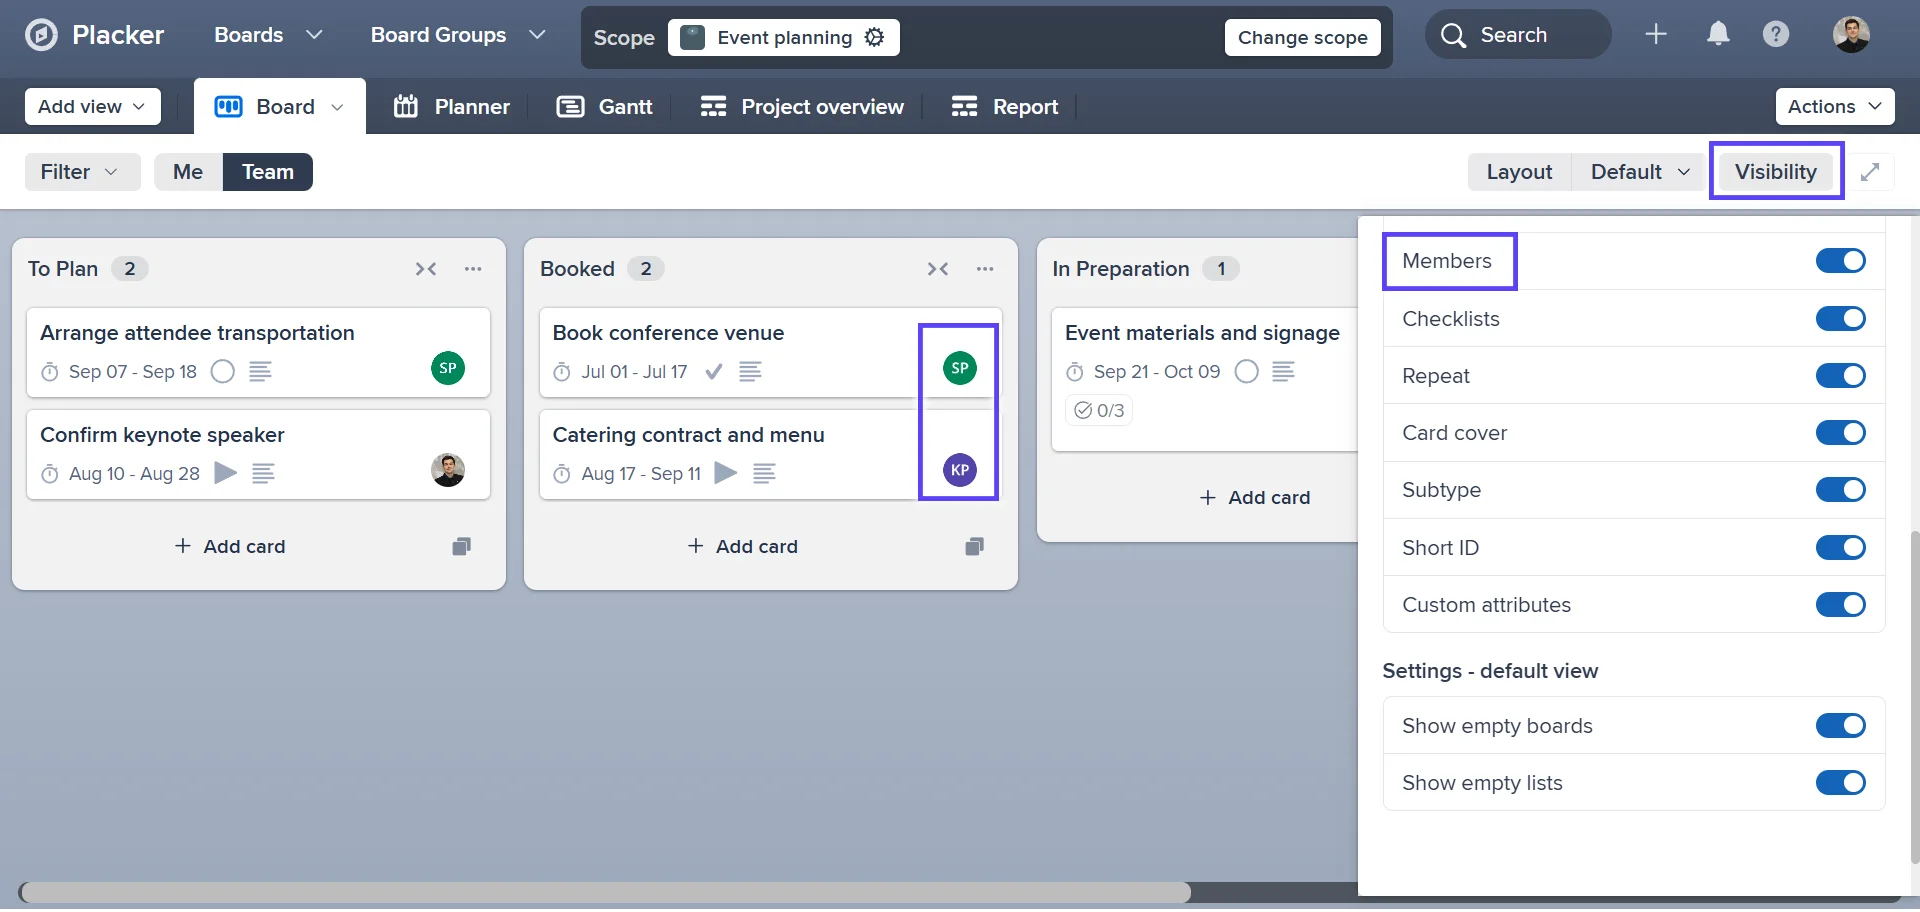
Define lo que muestran las tarjetas
Abre la Visibilidad y activa los atributos que quieres en la frente de la tarjeta, como duración y miembros. Desactiva las listas vacías para darle más espacio al trabajo activo.
- 3
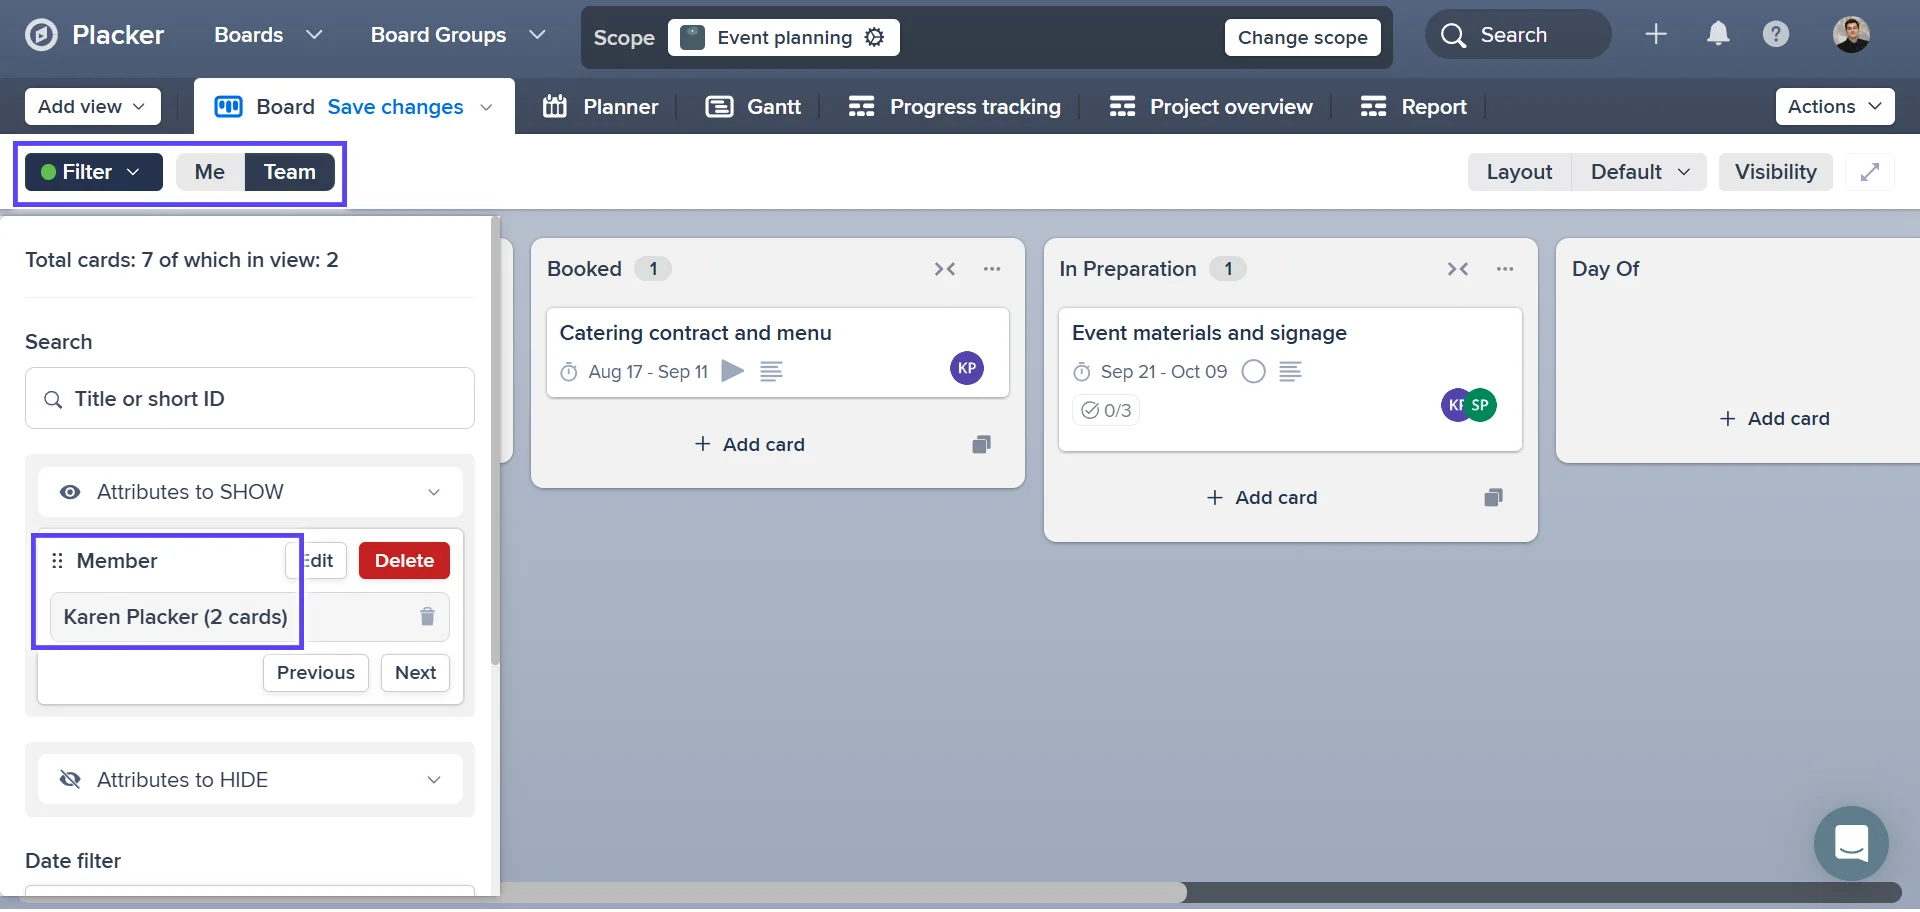
Filtra hasta las tarjetas correctas
Abre los Filtros y acota el tablero por miembro, etiqueta o fecha de entrega. Por ejemplo, muestra solo las tarjetas que vencen este mes para planear el periodo que viene.
- 4
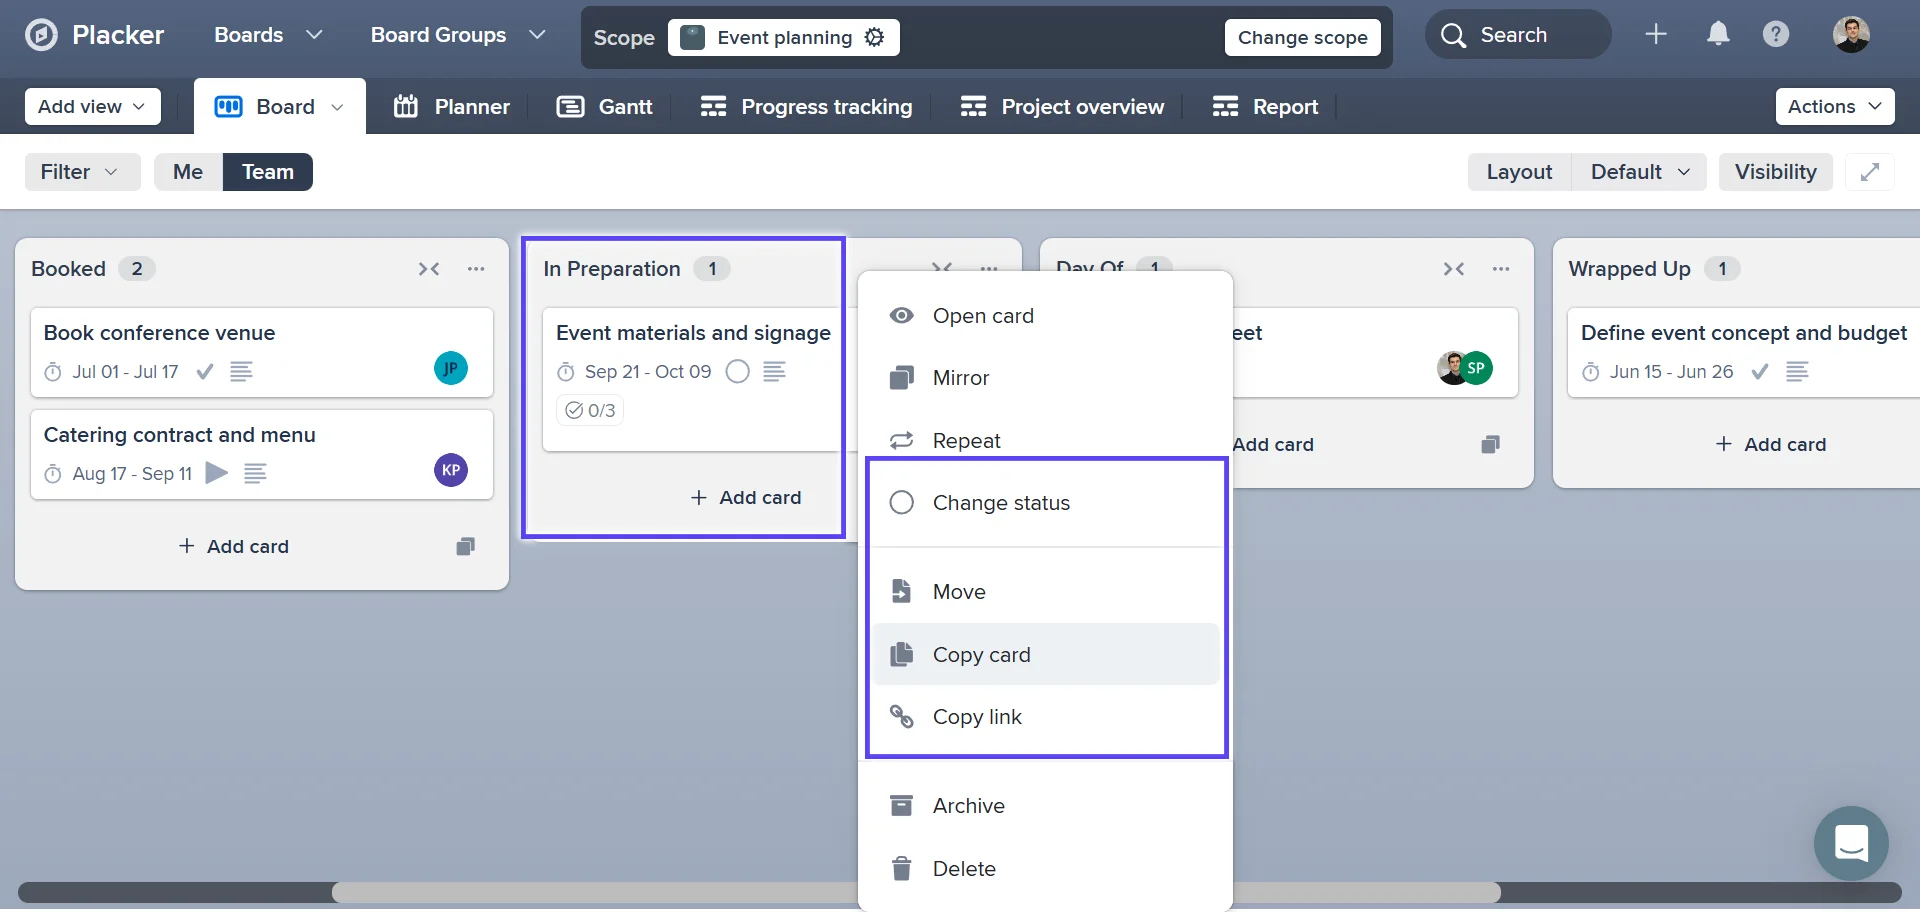
Mueve una tarjeta conforme avanza el trabajo
Arrastra una tarjeta a la siguiente lista cuando cambia su estado. Haz clic derecho en una tarjeta para más acciones: copiar la tarjeta, moverla, copiar su enlace, archivarla o eliminarla. El cambio se sincroniza en todos los lugares donde el tablero está conectado.
Casos de uso
Donde los equipos usan los tableros de Placker para organizar y dar seguimiento a su trabajo.
Equipo de entrega de agencia
Un líder de proyecto en una agencia pequeña lleva el trabajo de los clientes en un solo tablero, con listas para briefing, diseño, revisión y entrega. Configura la frente de la tarjeta para mostrar al responsable y la duración, así que un vistazo rápido revela quién está cargado y qué piezas están por terminar.
Operaciones internas
Un gerente de operaciones da seguimiento a las solicitudes que llegan en las etapas de entrada, en curso y cerrado. Filtra por los ítems que vencen esta semana y, en las reuniones diarias, usa la opción Yo/Equipo para que cada quien vea solo sus propias tarjetas.
Equipo de producto planificando un release
Un product manager mantiene el trabajo del release en un tablero y mueve las tarjetas de backlog a desarrollo y a prueba conforme el equipo las toma. Ocultar las listas vacías mantiene el tablero en las etapas que de verdad tienen tarjetas.
Consejos y buenas prácticas
Recomendaciones prácticas para aprovechar al máximo tu flujo de trabajo
Pon en la frente de la tarjeta solo los dos o tres atributos que buscas
Puedes mostrar cualquier atributo personalizado en la frente de la tarjeta, pero mostrarlos todos convierte el tablero en ruido. Elige los dos o tres que de verdad buscas, como el responsable y un indicador de estado, y deja el resto dentro de la tarjeta.
Copia una tarjeta ya configurada para reutilizar sus checklists en el trabajo recurrente
Cuando vuelve a aparecer el mismo tipo de tarea, copia una tarjeta que ya tiene sus checklists en lugar de rehacerlos. Así, cada lanzamiento, onboarding o release empieza con los mismos pasos listos para marcar.
Deja que las reglas muevan tarjetas y llenen campos conforme avanza el trabajo
Combina tu tablero con la Automatización para que una tarjeta pase a Listo cuando su checklist esté completo, o reciba un responsable en cuanto entra a una lista. El tablero se mantiene al día sin que nadie tenga que acordarse de actualizarlo.
Agrega algunas etiquetas y filtra el tablero para encontrar el trabajo rápido
A medida que el tablero se llena, etiqueta las tarjetas con un pequeño conjunto de etiquetas, como tipo, prioridad o cliente, y luego filtra para traer solo lo que necesitas. Así un tablero que crece sigue siendo fácil de buscar, en lugar de una pared de tarjetas por la que te desplazas sin fin.
Páginas relacionadas
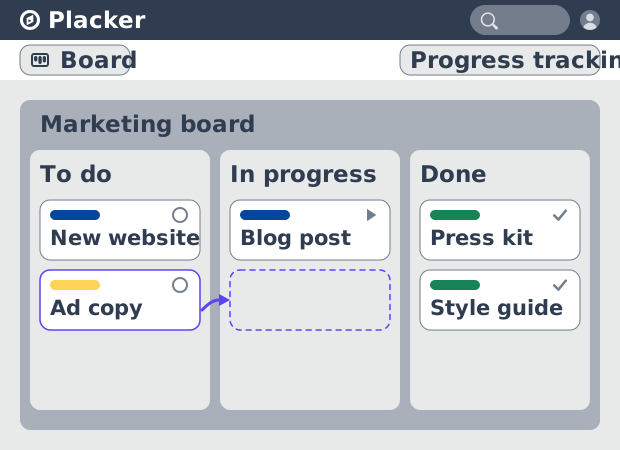
Vistas de tablero: un tablero, cualquier vista
Ve tu trabajo como tarjetas que avanzan por listas en Placker. Agrupa por miembro, carril o fecha de entrega y sigue el flujo con reportes Kanban.
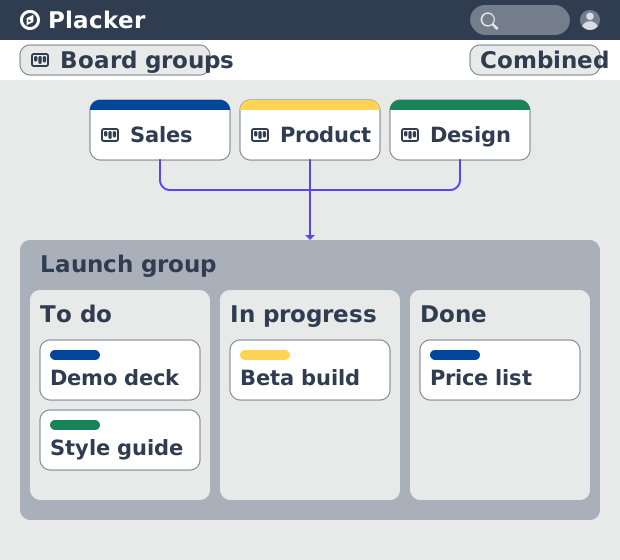
Grupos de Tableros: muchos tableros, gestionados como uno
Los Grupos de Tableros gestionan muchos tableros como un solo espacio: planea, filtra y reporta en todos, y guarda grupos reutilizables. Prueba gratis.
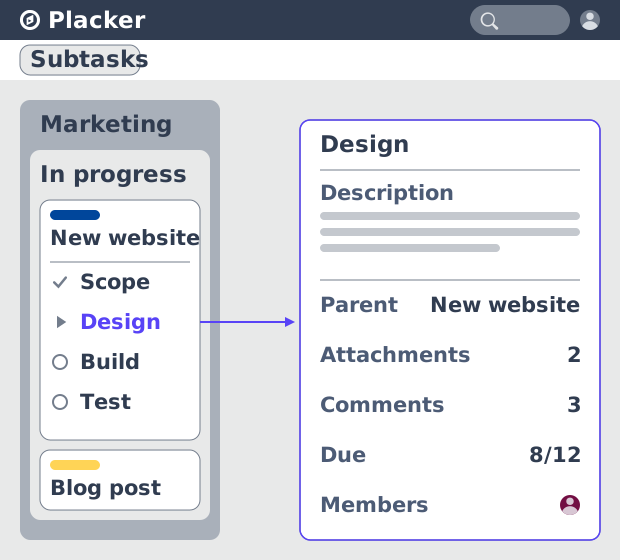
Tarjetas padre-hijo en Placker | Subtareas que suman
Las tarjetas padre-hijo en Placker dan a cada subtarea una tarjeta completa y suman esfuerzo, fechas y miembros en el padre. Lee el total arriba.
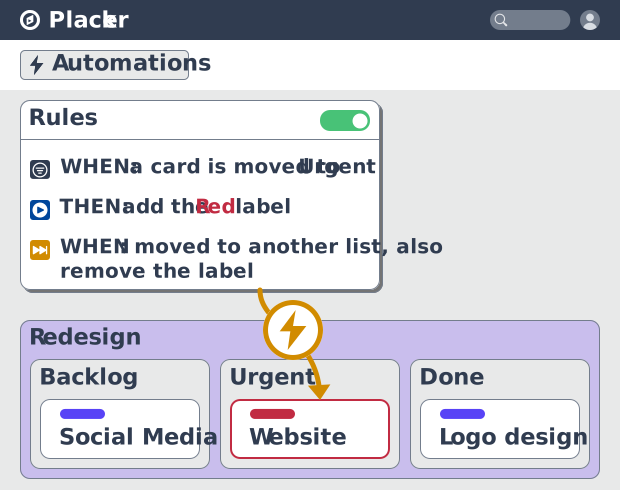
Reglas de automatización de tableros de proyecto, no-code
Automatiza tableros de proyecto con reglas condicionales. Placker crea espejos, mueve, asigna y actualiza tarjetas al cambiar el trabajo. Mira cómo funciona.
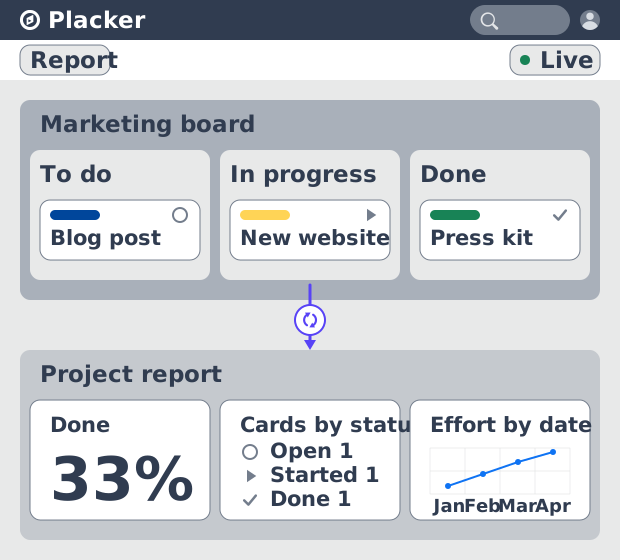
Dashboards y reportes de proyecto
Crea dashboards de proyecto en vivo: widgets KPI, tablas dinámicas, resúmenes de cartera y reportes PDF programados. Prueba Placker gratis.
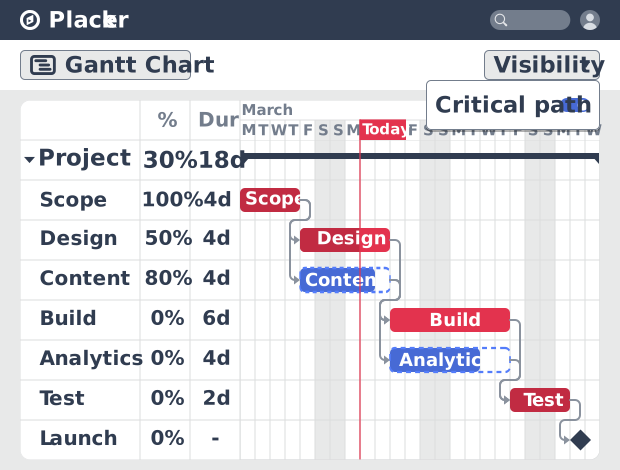
Software de Diagrama de Gantt con programación automática
Planea proyectos en un cronograma visual con el software de Diagrama de Gantt de Placker. Define dependencias, programa las fechas y sigue la ruta crítica.
¿Todo listo para comenzar?
Fácil de configurar, sin tarjeta de crédito. ¡Comienza tu prueba hoy mismo!